Sharing some DSLR knowledge...Get more Dynamic Range out of your Canon DSLR

Jeff_Lo

Active member
So I'm not a very regular contributor on here anymore but I thought I'd share this with you all. So everyone can afford DSLR's. They make a decent picture. The first problem many aren't aware of is using correct Picture Profile settings to actually get there shots to have the best information ready for Post Production.

One of the biggest problems with DSLR's is you have huge sensors, and those huge sensors enable you to capture AMAZING raw stills at a huge size. That doesn't translate to video. Instead you get a very small sample of what the sensor is actually capable of. Most people just shoot with the already pre-set picture profiles in there camera.

I learned a little about this in school. Dynamic Range is a huge set back for DSLR's, and ultimately will be until new codecs are implemented. The basic settings in camera don't allow your image to store as much information needed for post because of the heavy saturations and contrast.

Your goal should be to get in your camera and play with creating your own picture profile to try and flatten (turn down your saturation, contrast and sharpness) your image. It doesn't look the greatest right when your pulling it in to post, but as soon as you start to color you'll be pleased.

Doing this will allow your image to retain more information needed for coloring in post. Each camera has a certain amount of Dynamic Range, some more some less. The Sony F3 for example has a new firmware download called S-Log which allows the camera to have 13.5 stops of Dynamic range.

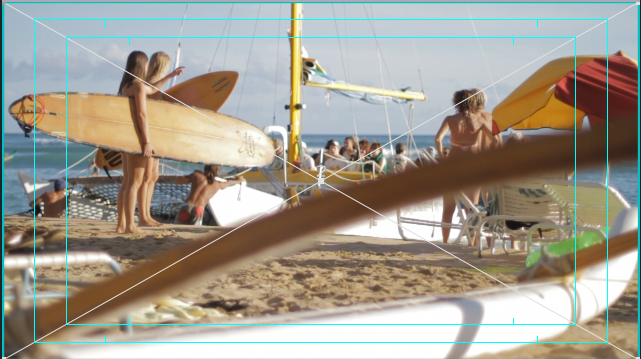
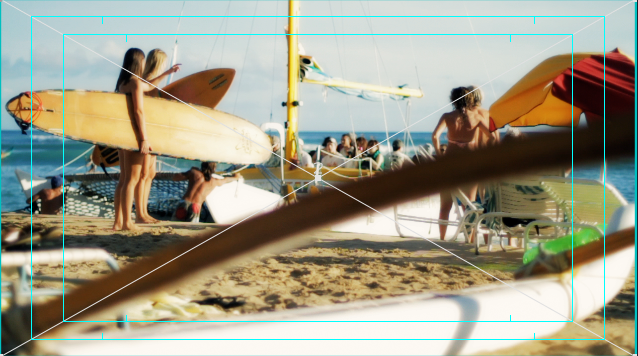
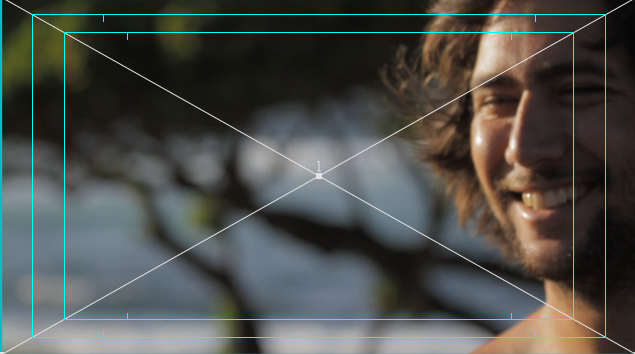
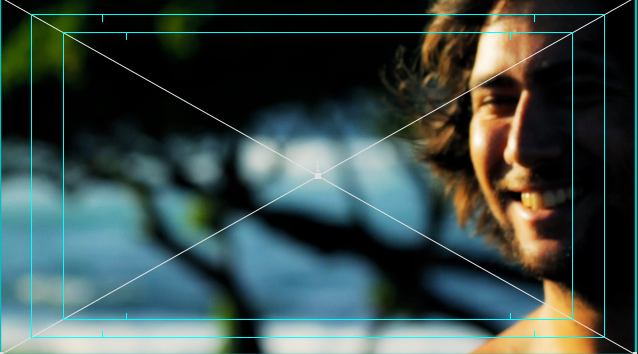
Here are some examples. All the first/flat photos are the raw shots out of camera, the second ones are colored in post. Be kind I'm not the best at coloring it's just some examples of Screen shots showing what a flat image profile can do:

Screenshot2011-11-27at22910PM.png


Screenshot2011-11-27at22921PM.png


Screenshot2011-11-27at23030PM.png


Screenshot2011-11-27at23638PM.png


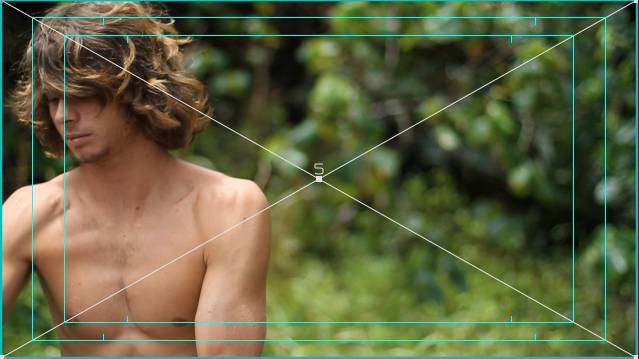
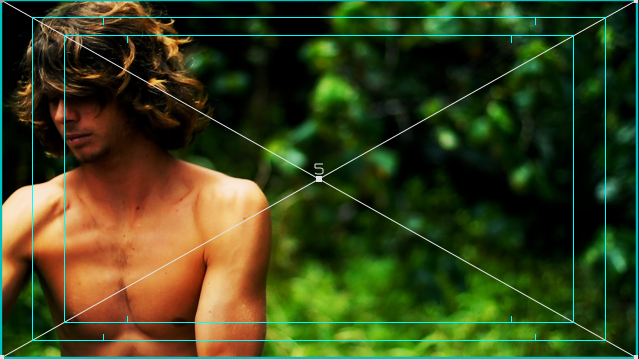
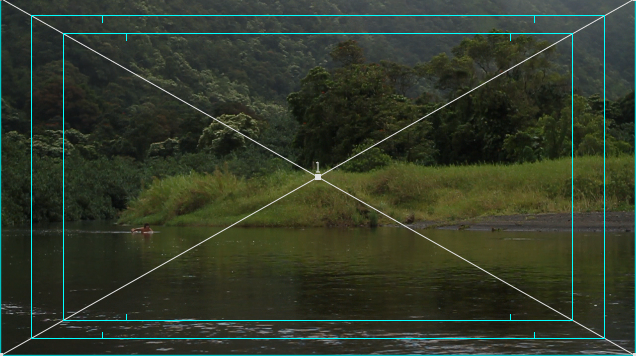
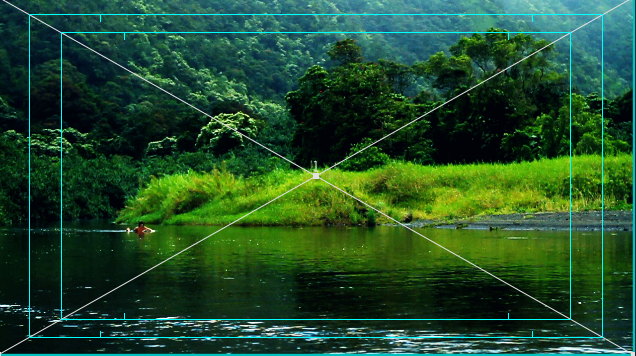
As you can see in a flat light day it helps a ton in my opinion. It gives you the ability to bend your footage just a little bit farther than you'd be able too just using your in camera settings. I tested about 5 different profiles by others than 3-4 of my own and finally found one I really liked.

If you took normal dslr picture profiles and added that much in post to them it would create noise and you'd see a ton of artifacts.

Screenshot2011-11-27at23231PM.png


Screenshot2011-11-27at23238PM.png


Screenshot2011-11-27at23103PM.png


Screenshot2011-11-27at23112PM.png


Screenshot2011-11-27at23157PM.png


Screenshot2011-11-27at23205PM.png


There are several ways to do this. You can do it in camera. I wish I still had a 7D, I'd show you step by step how to do it. But in any Canon you can do it in the software added to your computer. Not only can you do it in camera but you can do it with Picture Style Editor (available at Canon's website or with your included software, but frankly it sucks) It's better to do in camera.

If your not feeling to up to speed on creating your own there are several you can download. I use my own but here is the one I'd recommend if your not going to use your own:

It's called Superflat :http://www.stubbings.ch/yay/superflat01.zip

It should give you similar results. But you do have to be careful shooting this way. I tend to shoot a little more underexposed because I've noticed some whites clipping with flat profiles.

Ok now I'll walk you through how to install (you can also do this with a profile you create in Picture Style Editor):

First Open: EOS Utility (available at Canon's website or in your software included with the camera)

at this point make sure your camera is plugged in via USB and is in photo mode NOT VIDEO MODE.

Secondly you'll go to Camera Settings/Remote shooting.

Then you will click "Register User Defined Styles"

Then a small window will pop up allowing you to change your 3 Personal Picture Profiles and assign which created profile or "SuperFlat" you want to assign to User Defined 1, 2, or 3.

This is also where you can add or upload a created or downloaded picture profile to assign to one of the three user defined Picture profiles.

And then in camera after you've closed down the program you can choose the Picture Profile you'd like to use depending on where you assigned it.

Happy shooting!

 
Thank You Jeff! This is vary helpful and because of it i have gained a lot of knowledge haha This should be stickied for future reference!
 
Screenshot2011-11-27at22910PM.png


Screenshot2011-11-27at22921PM.png


first one is much better than the colored IMO but like you said you aren't very good at coloring. That picture profile produces pretty decent skin tones no homo
 
Yeah I'm not the best on the coloring front. I'm learning though. It's totally preference to everyone. I like a more saturated look like that.
 
does this not work with magic lantern hacked cameras? I keep on opening EOS utility with my camera plugged in and keep getting "camera not recodnized"
 
I'm not sure, but I could see that essentially preventing it from working. 7D's never had a Magic Lantern firmware hack so I never got to try it.
 
I have CineStyle's Technicolor profile loaded on my 7D (see http://philipbloom.net/2011/04/30/technicolor/ for info). The difference is really quite impressive, especially in low light. I also have contrast and sharpness turned all the way down, and saturation turned down by two notches.

I haven't looked into it extensively, but I'd assume that by reducing the dynamic range in camera, there would be a greater likelihood of banding in low-contrast areas after post processing. For my purposes, it makes no difference.
 
Some of those were very underexposed. But i use the Cinestyle picture style (google it for a download) and LOVE grading it, you can really get some much better colors and looks with it.
 
and what does sharpness do in video? I recently turned mine back up because i don't add any sharpening in post or even know how to do it, should i be?
 
I always keep my sharpness turned all the way down and never do sharpening in post. in my opinion, it does nothing but hurt the image
 
Like I stated. With flat profiles you get clipping with whites. I underexpose when shooting to make sure it didn't clip.
 
I shot it during a flat light day in Hawaii. In post I used some settings to bring it up and give the environment color
 
Possibly in your eyes. I hit the looks I was going for in those particular shots. The point of this thread isn't for a critique it's to share this with others so they can use picture profiles to give there images more info.
 
yeah I'm aware. You did do a great job highlighting what can be done with the flat picture styles, which is why I love using them so much, there is so much potential with them!
 
Thanks,

These were my first coloring tests with Davinci back in June, at that point I wasn't to familiar. I just pulled up the edit and took quick screen shots. Had I colored it now it may be different. Alot of times what I like most others don't, in regards to coloring.
 
i dont really know what i did wrong. when it shows up in EOS utility, the superflat is there in my user 2. but when i go to my camera, all 3 users are the same non superflat settings.
 
If you set it to one, it will be there. It will show up as User 1, 2, 3 still in camera. Choose the one you set it to. Go back to your viewer mode, and it will show the difference.
 
As much as I would like to believe shooting flat is a cure-all, my experiences prove otherwise time after time.

Shooting flat is optimal when you have a solid codec (10-bit and/or RAW), but with Canon's shitty h.264 (4:2:0, 8-bit), shooting flat causes too many problems like noise and banding. The noise is caused by having to "push" the image to its limits when it's a weak codec in the first place. The banding is caused by the 8-bit codec because it doesn't offer enough headroom to accomodate the perceived increase in DR; technically, no DR is gained. The camera simply registers the extremes of the tonal spectrum as being at the edge of the mids, rather than being designated as "highs" and "lows."

I honestly haven't ever needed more dynamic range from my DSLR footage. In diffuse light I get full detail in shadows and hardly any clipping in the skies. Any clipping that does exist isn't an issue in itself, rather the ugly clipping from video is the result of the knee and not the clipping itself (capping the highlights in the output grade fixes this). In hard light I don't need more pseudo-DR because I've found the perfect balance of contrast and saturation in the picture profiles that require nothing more than subtle tweaks in post.

The truth is, clipping is a necessary evil. It just happens to look harsh on video not because clipping in itself is fundamentally bad, but for two main reasons: 1) video cameras tend to have a VERY sharp knee, and 2) values are absolute rather than arbitrary. The sharp knee with digital footage makes the highlights look like blemishes rather than feathery, beautiful bursts of light like with film. I say that digital values are absolute because they are registered quantitatively and are thus able to render values past what is seen on film, also known as clipping. With film you are seeing light passing through film, which is not 100% translucent. I liken this to looking through a compound microscope. The illuminated background may be white and seemingly textureless, but it isn't because you are viewing it via light projected on various glass elements, each of which are not completely free of subtle blemishes (grain, dust, hair, etc.) With digital footage these interceptors do not exist, and so when viewing values that are seemingly just as bright, they appear artificial bland. As I said earlier, this can be compensated for by feathering the knee and grading the footage to raise the black level and lower the white level in the OUTPUT stage (you can still crush blacks relative to mids/highs; the output only changes master values).

Another point I wanted to make, albiet unconventional, is that having that much "control" in post takes away half the fun. If I can turn on my camera, press record, and trust that I can somewhat salvage the image in post, half of the experience is missing to me. There's no "hunt" involved.
 
I stole your custom colour style from another thread and it works really well. Most of the recent stuff on my flickr was shot using it, and then I pushed the curves in post.
 
I use cinestyle and have a plugin in fcp that neutralizes the footage. i (supposedly) get a few more stops of dynamic range out of it...worth it? maybe
 
I never said the flat profile would give the image more DR, that I saw or remembered typing. But it does allow you to do more with the footage in post. I have tested this. I did say however it allows the image to retain more information while recording instead of having your highlights and shadows as blown out (lost information) it neutralizes them a little and gives you more control of them in post.
 
Can you leave it on manual for Video? What camera? I had a 7D so I was able to leave it on manual when shooting video.
 
na, i have a t3i, has to be in viideo mode. once i go to the picture profiles, i see the pre set ones tthen the user 1 2 3 but there all set to auto, even though on eos utility user 2 iis set to super flat
 
hmmm...i'll look into it, my little brother happens to be in town today and he has a t3i. I'll get back to you.
 
Yea because you have to set them, I don't have my t2i on me now but it's in the manual, I'm pretty sure you go over a user def and press display or enter to set it
 
Ok so I didn't explain this the best yesterday. My best understanding and what I've learned from using flat profiles is when shooting a preset profile your camera will shoot with more contrast and saturation. That contrast means your shadows (black) and your highlights (white) are more likely to be outside of what is retrievable information.

Regardless if it doesn't add DR it does neutralize your shadows and highlights to give you more information in that part of the file. In a normal preset say where snow might be blown out and the trees might be to dark to pull it up in post, or bring down the highlights in post, using a flat profile allows the camera to capture more information in those parts of the shots to allow it to be used and still viewable without being blown out or underexposed and un-usable.
 
You need to help yourself then, I told you it's all in the manual and it'll take you three seconds to look it up
 
Well said, this actually seems to answer questions I had on a few shots I got this summer. They were so blown out that I couldn't fix them in post, which as you outlined is frustrating because all of that information is useless. If I had used a flat profile, the mistake I made with too high an exposure may well have been fixable. Also, I may have had more DR in each frame allowing me to have more control over color to mend the damage that comes with severely blown out images.

Correct me if I don't understand.
 
Shooting flat definitely has its perks in specific situations, such as scenes where there is a dramatic difference in lighting between two dominant areas of the frame. It can also achieve a very good image in diffuse light if your final output is going to be diffuse.

My point is that if you can get away with not shooting flat, you'll likely be better off because you won't have banding/noise issues. You can shoot stock picture profiles without having a ton of contrast/saturation, and therefore retrievable information in the lows/highs; the trick is to find the proper balance of information and contrast. Cranking up the contrast arguably does just as much damage as shooting flat as possible in every scenario.
 
I'll stick with the Neutral profile. I've always thought that the flat profiles were so gimmicky. Why you'd want to take a flat image and try to breathe life back into it with a sub par codec makes no sense. You really aren't gaining much with a flat profile. Why not just get a nice looking image out of camera? It's always better to work with the cam, not against it.

also, your first screen grabs all look pretty good to my eye, natural, much nicer than the graded ones.
 
I agree. I really prefer the graded version of the second image, but the rest look much better prior to you grading them.

And I realize it comes down to taste, but why did you grade the first image to be high contrast? The image had soft light, and artificially creating a hard light look in post seems completely beside the point because you aren't actually changing the direction/intensity of the shadows/tones. You are artificially exaggerating the gradients that are actually subtle in reality. Why try to make the saturation/contrast look intense rather than embracing the beauty that diffuse light offers? Again no offense, I was just trying to understand your reasoning here, because to me it seems like you're set on making everything look like it was shot in sunny conditions, rather than embracing the image for what it is.
 
+1 on cinestyle. This is a really legit preset. If you ever work with a real colorist, they go nuts for this shit.
 
Back
Top