You are using an out of date browser. It may not display this or other websites correctly.
You should upgrade or use an alternative browser.
You should upgrade or use an alternative browser.
HOW TO MAKE A CREWNECK TUTORIAL
- Thread starter IanAdams
- Start date
PaintedHearts
Active member
I bought a pattern, Ian got it here really fast and he is easy to get in contact with and super helpful. I will post pictures once I finish mine. If you are thinking about getting one, get one from him.
PeteyWykes
Member
super sick


IanAdams
Member
Thanks for all the love everybody, and thanks for the shout out Bailey! Your sweatshirt looks good Nubb, hope I helped.
Join my cult everybody: https://www.newschoolers.com/ns/cult/home/id/5020/t/The+Kingdom/
Join my cult everybody: https://www.newschoolers.com/ns/cult/home/id/5020/t/The+Kingdom/
squawshredder
Member
bump
PaintedHearts
Active member
I bought a pattern from Ian, and as I said in a previous post he was super helpful and if you are thinking about getting something from him I would say do it, I don't think you will be disappointed! ")
So, here is a picture of my finished crewneck. (keep in mind this is the first thing I've sewn in five years haha) I love it, it's super comfortable! Thanks Again Ian!

Also, sorry in advance if the picture doesn't work.....I haven't posted one before.
So, here is a picture of my finished crewneck. (keep in mind this is the first thing I've sewn in five years haha) I love it, it's super comfortable! Thanks Again Ian!
Also, sorry in advance if the picture doesn't work.....I haven't posted one before.
PaintedHearts
Active member
+K for working picture.
https://www.newschoolers.com/ns/content/pictures/id/370106/member_id/136791/
https://www.newschoolers.com/ns/content/pictures/id/370106/member_id/136791/
FreeskierRocco.
Active member
threads for later
JohnnyQuid
Member
threads, brah!
Imagination
Active member
My threads, 10/10 K for all of th work this must have taken
Dirty_Griddle
Member

boom sew that
very impressive tutorial some day i'll make one
IanAdams
Member
MAKING AND ADDING
A HOOD TO A CREWNECK:
So you’ve mastered the crewneck and you’re ready to add a
hood for that extra element of steeze. Right, so where do we start? If you don’t
have any sort of patter, that’s fine, find a hood that you like and trace it onto
a piece of paper and then use a straight edge and some drawing skills to neaten
it up. I personally went through about 5 different hood designs ‘til I found
the “perfect hood” that is big enough to fit a helmet under comfortably and still
looks and feels great without a helmet. Here’s what the pattern looks like:
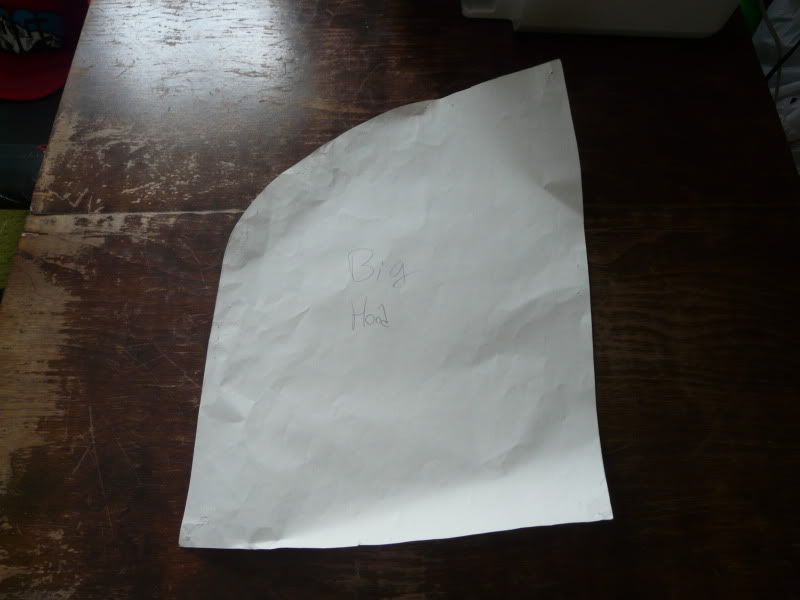
Not that complicated. So I assume you are pretty acquainted
with sewing and crafting apparel at this point because you have (hopefully)
already successfully made a crewneck to put a hood on. So the first thing you
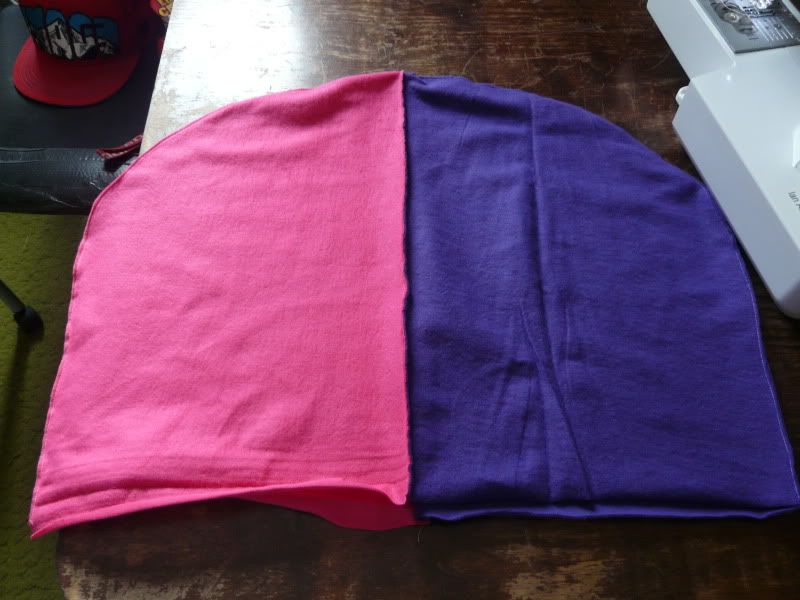
are going to do is use your pattern to make 4 quarters of your hood. HOWEVER,
you need to make 2 in one orientation of the pattern and then FLIP IT OVER and
make two oppositely oriented pieces. I hope that makes sense. Study the
following image carefully if you didn’t understand what I just said:
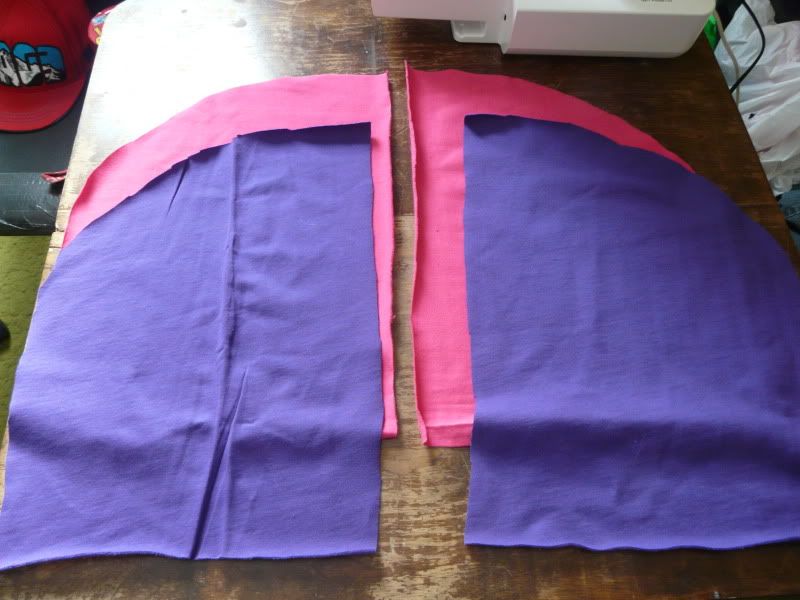
Obviously from this picture I’m gonna be making a two tone
hood. This not only looks sweet but helps with the visualization in this
tutorial. Yay! Anyways, next you wanna stitch each pair along the curvy edge
and trim the excess material that results from your seam:
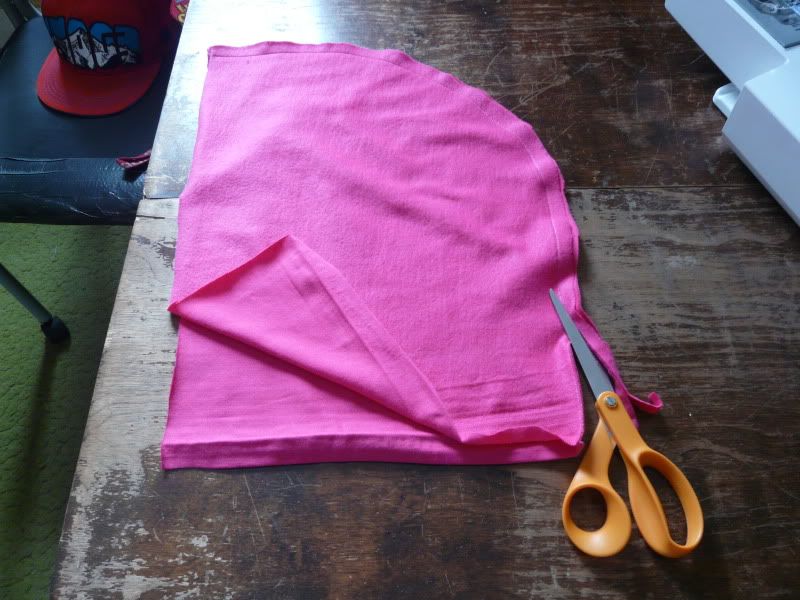
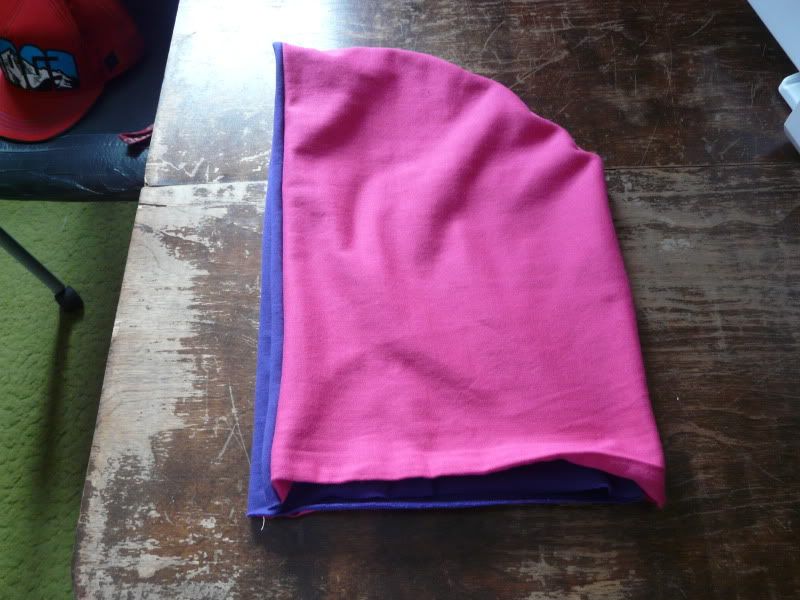
Do this for both:
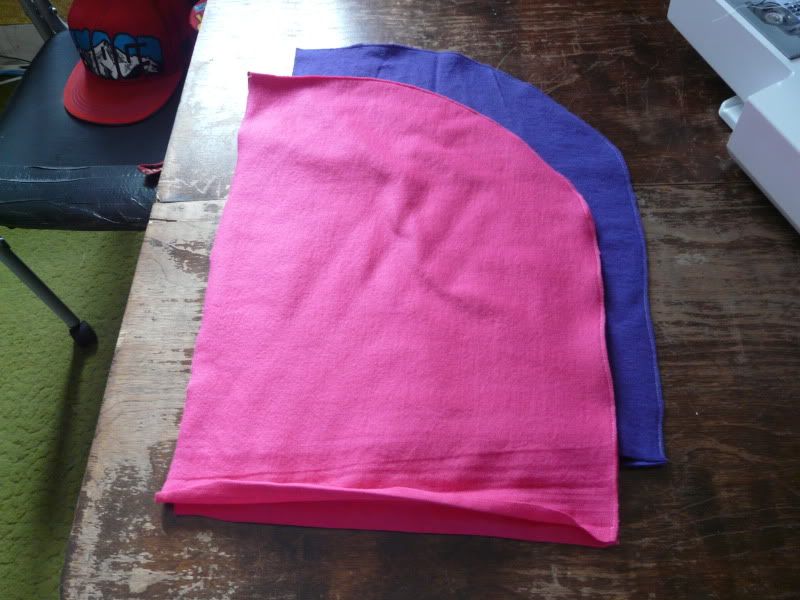
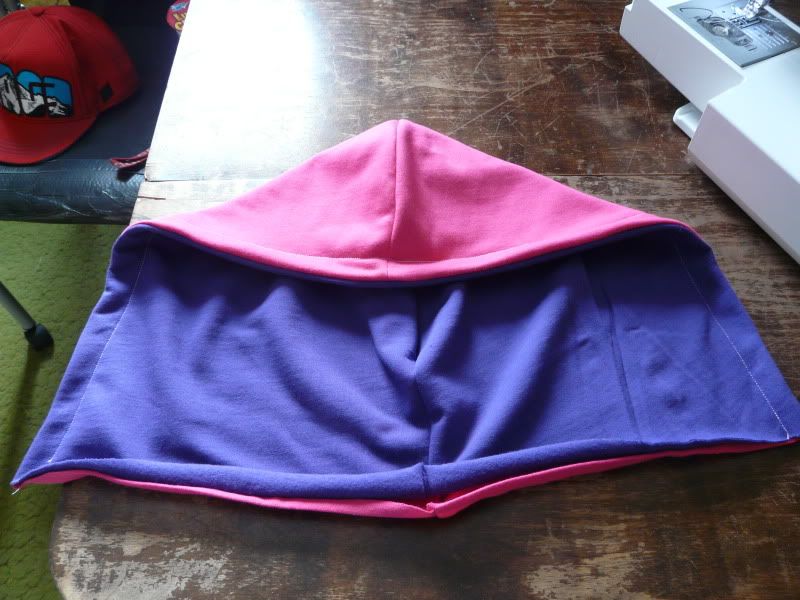
Next you’re gonna sew the two resulting pieces together at
the “face hole edge” as I like to call it(it’s just the longer of the two
straight edges). BE CAREFUL WHEN YOU DO THIS PART and make sure you have smooth
side facing smooth side before you sew., and that you’re sewing the correct
edges together. Take your time and wrap your brain around what you are doing. This
is not a race. Visualize how a hood is put together.
Trim the edge of this seam as well and then manhandle it
until you have something that resembles a hood like the following:
Some of these steps are only necessary if you want a
drawcord on your hood. I personally think they are awesome cause you can tie
them while your skiing so your hood doesn’t fall off your helmet(if you don’t
wear a helmet you’re an idiot, but it’s your head, do what you want). They are
also fun to chew on in class and can add an extra element of color to your
sweatshirt for added steeze points.
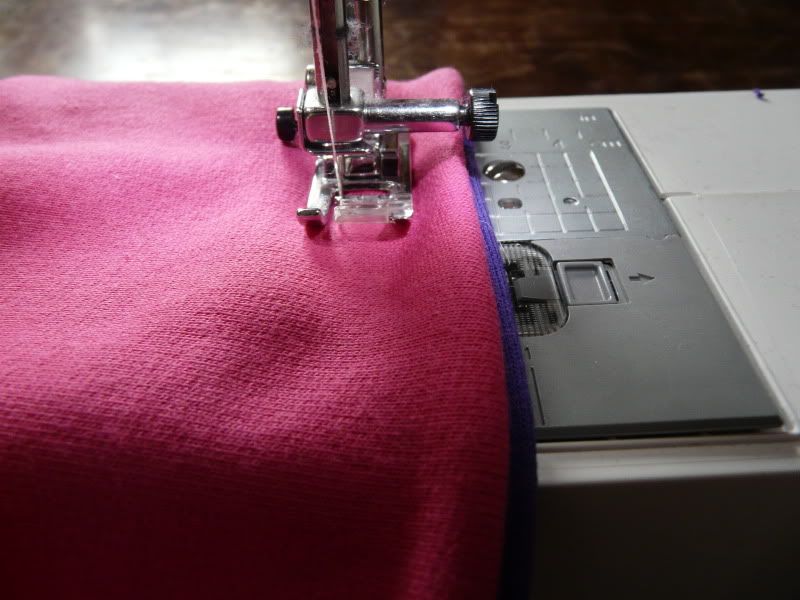
The first thing we are gonna do is to take our hood and make
a stitch 1 inch away from the edge of the “face hole edge”. This is going to
make sure the drawcord doesn’t drift around inside the hood and look dumb. PAY
ATTENTION TO WHAT COLOR THREAD YOU ARE USING BECAUSE IT WILL SHOW UP IN THIS
STITCH. DON’T USE A DUMB COLOR AND LOOK LIKE A BAFFOON. The following image shows exactly what you are
gonna do. Notice the little “1” on the metal part of the sewing machine. That
means you’re stitching 1” away from the edge.
The Result:
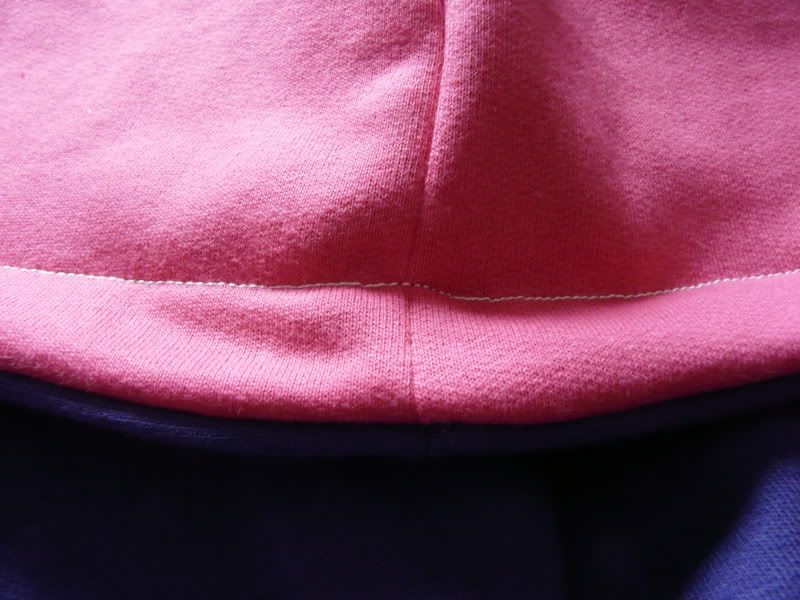
Your hood is already looking steezy. You’re stoked aren’t
you? I thought so.
So now you have a crew with a bare neck and a weird flap of
material…

HOW THE HECK DO I ATTATCH THESE TOGETHER IN A COHERENT
MANNER THAT DOESN’T LOOK IDIOTIC??? I will now tell you:
Alright so in retrospect I didn’t take enough pictures of
this portion but you’re pretty bright I assume by now , so I will attempt to
convey in words how this is done, please bear with me. So, the general premise
is that (using the colors in the pictures to explain) you are gonna take the
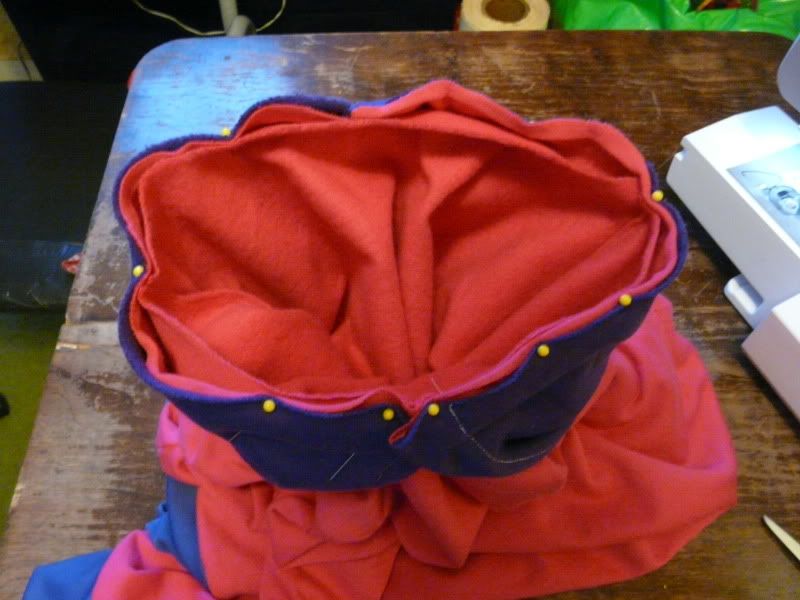
crew, wrap the hood around the neck of the crew PINK PART ON THE HOOD AGAINST
THE PINK OF THE SWEATSIRT. Start by putting the middle of the neck of the
hood(there is a seam there) on the very back and middle of the crew’s neck and
pinning there. Then work your way around the neck pinning every 2 inches or so.
If you have a well made hood pattern like mine, /shamelessselfpromotion, you
should end up with about a little bit of overlap between the ends of the hood. Try
to get this part as front and centered as you can and pin it very well so it
doesn’t get mucked up when you’re sewing. The result of all this will look like
this;
Carefully sew the neck TAKE YOUR GOD DAMNED TIME THIS IS
STILL NOT A RACE. You will end up with this:
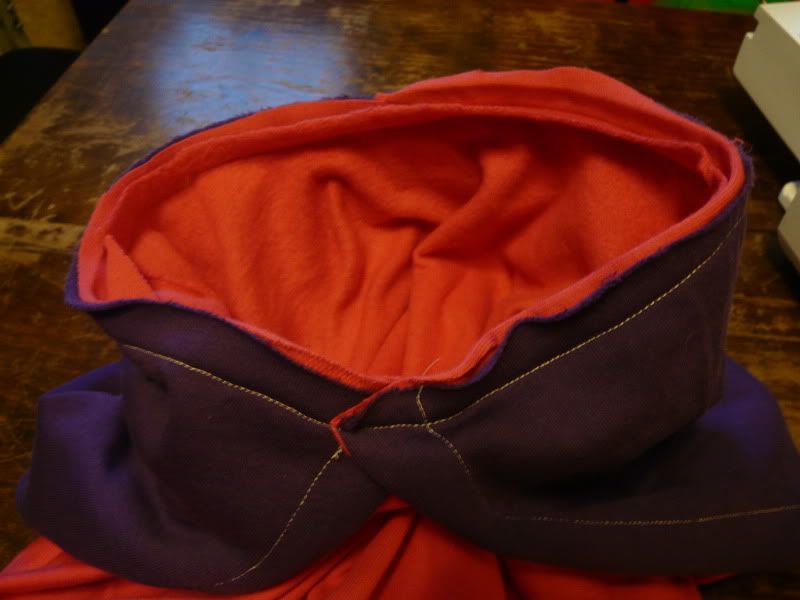
Flip her up and you get this:
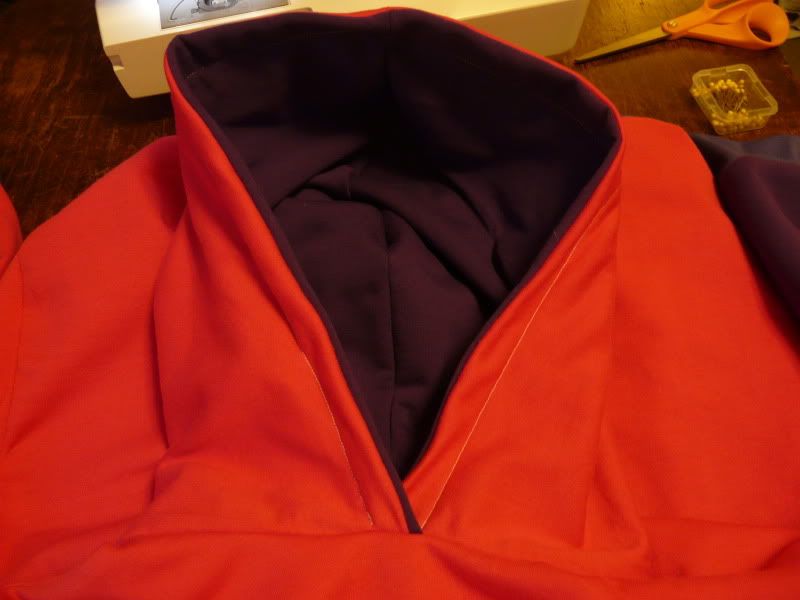
Now we’re gonna install the drawcords. First we have to make
some holes for them. Use scissors and make SMALL incisions in the fold like the
following image. DON’T F**K THIS UP OR YOU WILL WANT TO KILL YOURSELF.
So you successfully cut holes, good job champ. Now for the
actual cord, remember that little extra set of laces that came with your Nike
SB dunk High’s? Of course you do.Dig those out of your desk drawer and thread
them through one of the holes and slowly work the lace through the hood. This
take a long time. Deal with it. Also, try to match the laces with the thread
you used on the 1” away hood stitch, it looks a lot cooler when you do so.
Yessssssss lookin’ good.
YOU DID IT!!!! Now bask in the glorious garment that you
have created WITH YOUR OWN TWO HANDS. Now find the nearest mirror and snap some
pics and plaster them all over your Facebook and DEFINITELY make a thread in
NSG to show it off.
Oh yeah and you probably are wondering how this hoodie fits
and crap. Here’s a pic of really really ridiculously good looking person
wearing one:
If you have any questions hit me up on here or better yet on
Facebook via the “Ian Adams” who goes to University of Vermont. If you want to
purchase a set of patterns(which now includes the hood pattern as well) hit me
up as well. I will finely craft a set and ship it to you for 15 bucks.
GOOD LUCK!!!
PS – NO, I don’t want to make a custom for you. YES, I have
some for sale that I have made and I would love for you to buy one. If you are
interested, search “Kingdom Textiles” on Facebook, friend it and suggest it to
your friends, I just made it today so it’s sparse with info now but over the
next week it will be blowing up with info/pics. Keep your eyes peeled. Much
love.
-
- Ian
A HOOD TO A CREWNECK:
So you’ve mastered the crewneck and you’re ready to add a
hood for that extra element of steeze. Right, so where do we start? If you don’t
have any sort of patter, that’s fine, find a hood that you like and trace it onto
a piece of paper and then use a straight edge and some drawing skills to neaten
it up. I personally went through about 5 different hood designs ‘til I found
the “perfect hood” that is big enough to fit a helmet under comfortably and still
looks and feels great without a helmet. Here’s what the pattern looks like:
Not that complicated. So I assume you are pretty acquainted
with sewing and crafting apparel at this point because you have (hopefully)
already successfully made a crewneck to put a hood on. So the first thing you
are going to do is use your pattern to make 4 quarters of your hood. HOWEVER,
you need to make 2 in one orientation of the pattern and then FLIP IT OVER and
make two oppositely oriented pieces. I hope that makes sense. Study the
following image carefully if you didn’t understand what I just said:
Obviously from this picture I’m gonna be making a two tone
hood. This not only looks sweet but helps with the visualization in this
tutorial. Yay! Anyways, next you wanna stitch each pair along the curvy edge
and trim the excess material that results from your seam:
Do this for both:
Next you’re gonna sew the two resulting pieces together at
the “face hole edge” as I like to call it(it’s just the longer of the two
straight edges). BE CAREFUL WHEN YOU DO THIS PART and make sure you have smooth
side facing smooth side before you sew., and that you’re sewing the correct
edges together. Take your time and wrap your brain around what you are doing. This
is not a race. Visualize how a hood is put together.
Trim the edge of this seam as well and then manhandle it
until you have something that resembles a hood like the following:
Some of these steps are only necessary if you want a
drawcord on your hood. I personally think they are awesome cause you can tie
them while your skiing so your hood doesn’t fall off your helmet(if you don’t
wear a helmet you’re an idiot, but it’s your head, do what you want). They are
also fun to chew on in class and can add an extra element of color to your
sweatshirt for added steeze points.
The first thing we are gonna do is to take our hood and make
a stitch 1 inch away from the edge of the “face hole edge”. This is going to
make sure the drawcord doesn’t drift around inside the hood and look dumb. PAY
ATTENTION TO WHAT COLOR THREAD YOU ARE USING BECAUSE IT WILL SHOW UP IN THIS
STITCH. DON’T USE A DUMB COLOR AND LOOK LIKE A BAFFOON. The following image shows exactly what you are
gonna do. Notice the little “1” on the metal part of the sewing machine. That
means you’re stitching 1” away from the edge.
The Result:
Your hood is already looking steezy. You’re stoked aren’t
you? I thought so.
So now you have a crew with a bare neck and a weird flap of
material…
HOW THE HECK DO I ATTATCH THESE TOGETHER IN A COHERENT
MANNER THAT DOESN’T LOOK IDIOTIC??? I will now tell you:
Alright so in retrospect I didn’t take enough pictures of
this portion but you’re pretty bright I assume by now , so I will attempt to
convey in words how this is done, please bear with me. So, the general premise
is that (using the colors in the pictures to explain) you are gonna take the
crew, wrap the hood around the neck of the crew PINK PART ON THE HOOD AGAINST
THE PINK OF THE SWEATSIRT. Start by putting the middle of the neck of the
hood(there is a seam there) on the very back and middle of the crew’s neck and
pinning there. Then work your way around the neck pinning every 2 inches or so.
If you have a well made hood pattern like mine, /shamelessselfpromotion, you
should end up with about a little bit of overlap between the ends of the hood. Try
to get this part as front and centered as you can and pin it very well so it
doesn’t get mucked up when you’re sewing. The result of all this will look like
this;
Carefully sew the neck TAKE YOUR GOD DAMNED TIME THIS IS
STILL NOT A RACE. You will end up with this:
Flip her up and you get this:
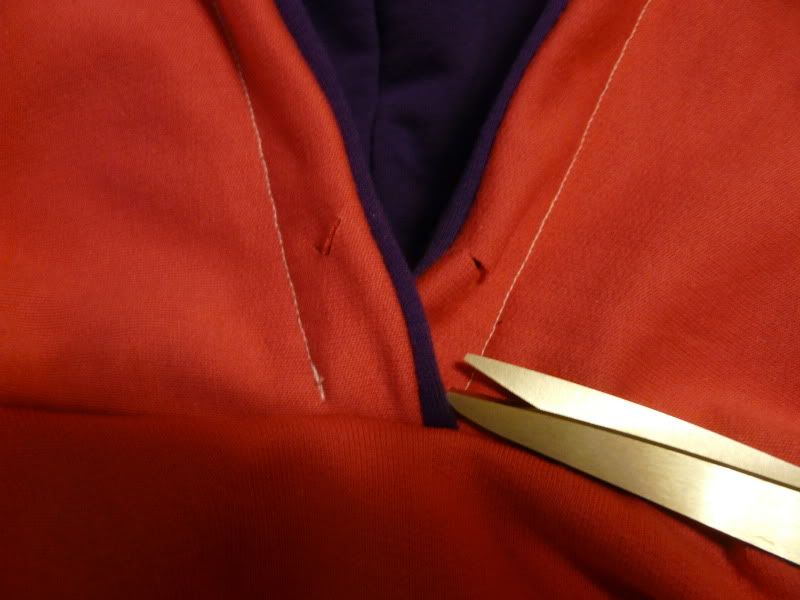
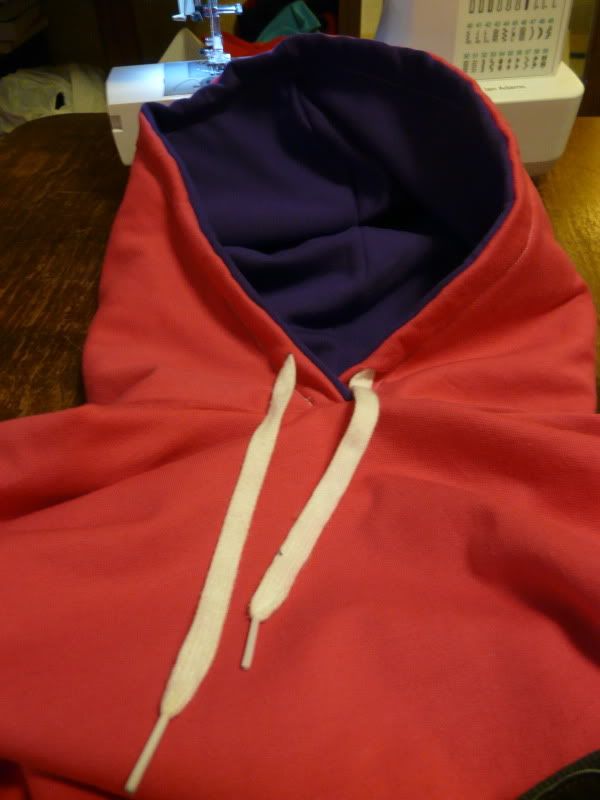
Now we’re gonna install the drawcords. First we have to make
some holes for them. Use scissors and make SMALL incisions in the fold like the
following image. DON’T F**K THIS UP OR YOU WILL WANT TO KILL YOURSELF.
So you successfully cut holes, good job champ. Now for the
actual cord, remember that little extra set of laces that came with your Nike
SB dunk High’s? Of course you do.Dig those out of your desk drawer and thread
them through one of the holes and slowly work the lace through the hood. This
take a long time. Deal with it. Also, try to match the laces with the thread
you used on the 1” away hood stitch, it looks a lot cooler when you do so.
Yessssssss lookin’ good.
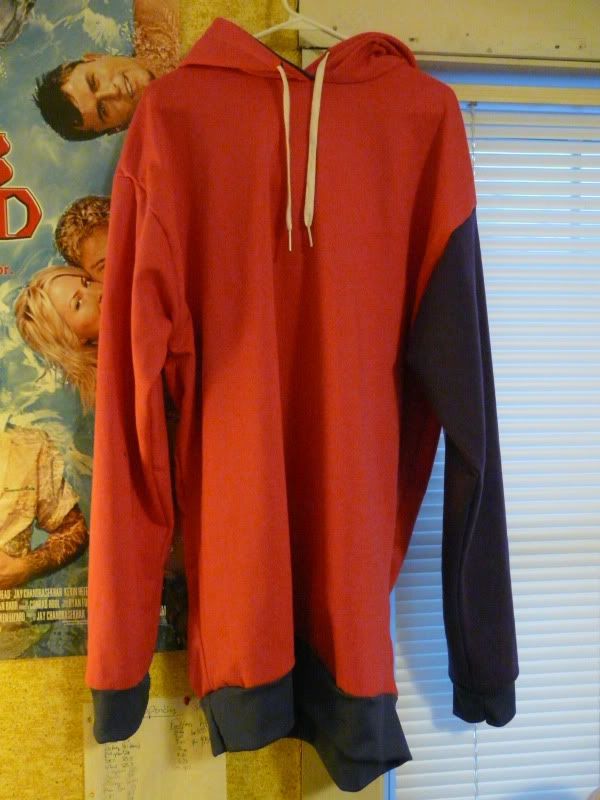
YOU DID IT!!!! Now bask in the glorious garment that you
have created WITH YOUR OWN TWO HANDS. Now find the nearest mirror and snap some
pics and plaster them all over your Facebook and DEFINITELY make a thread in
NSG to show it off.
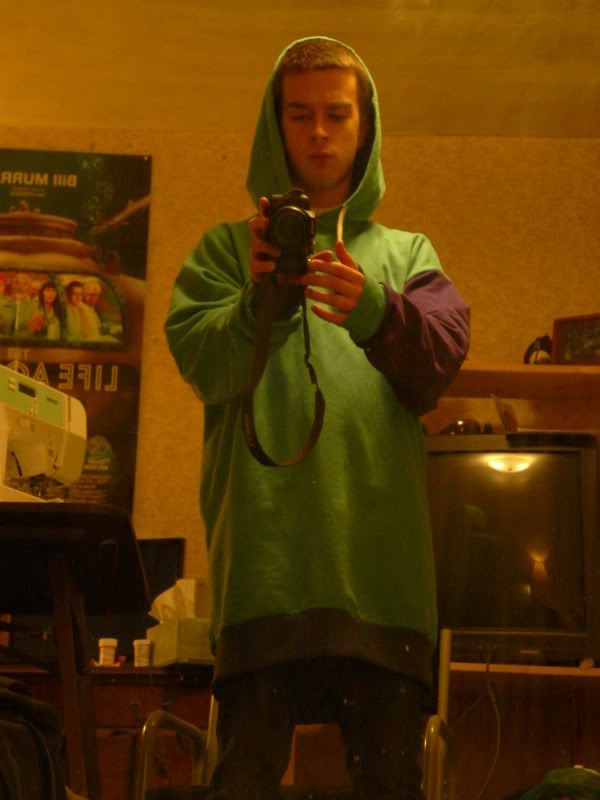
Oh yeah and you probably are wondering how this hoodie fits
and crap. Here’s a pic of really really ridiculously good looking person
wearing one:
If you have any questions hit me up on here or better yet on
Facebook via the “Ian Adams” who goes to University of Vermont. If you want to
purchase a set of patterns(which now includes the hood pattern as well) hit me
up as well. I will finely craft a set and ship it to you for 15 bucks.
GOOD LUCK!!!
PS – NO, I don’t want to make a custom for you. YES, I have
some for sale that I have made and I would love for you to buy one. If you are
interested, search “Kingdom Textiles” on Facebook, friend it and suggest it to
your friends, I just made it today so it’s sparse with info now but over the
next week it will be blowing up with info/pics. Keep your eyes peeled. Much
love.
-
- Ian
*valkyrie*
Member
/threads
I have always made mine by the seat of my pants, so it would be nice to have some instruction
I have always made mine by the seat of my pants, so it would be nice to have some instruction
Davy.Crockett
Active member
my threads. sorry if its already been asked because i haven't read the whole think yet but did you use a serger?
IanAdams
Member
Yeah sure why not as long as you buy me a ring. I like white gold. Lots of it.
And to the question about the serger, I honestly have no fucking clue what a serger is or does and am too lazy to google it. I've never actually read anything about sewing so I may not understand a lot of the terminology. I taught myself to do everything I do by trial and (lots of) error and have done it so much that I've worked out most of the kinks before I pass on the info to ya'll. Hope that helped.
Just a reminder to everyone to friend "Kingdom Textiles" on facebook so I can feel better about myself and the hours I spent on these tutorials ;D
trettzilla
Member
.
hunterBear
Member
threads and +K!!
IanAdams
Member
Nope I got it from fabric stores online and local. It's straight up called sweatshirt fabric. It can be hard to find at times atleast in good colors but you can find it online. I think I might have said a little bit about it at the very beggining of the tutorial. I also talk about how much you need in that portion.
And to whoever offered me that tantalizing offer of karma for a hoodie, I'm gonna have to decline on that one.
And to whoever offered me that tantalizing offer of karma for a hoodie, I'm gonna have to decline on that one.
YoungQuinton
Member
threads for when i have some time