PartyBullshiit
Active member
Had to mold my new liners so figured I’d make a little thread to help others out in the future. I’m personally using the rice method. It’s pretty safe overall compared to using an oven on your liners.
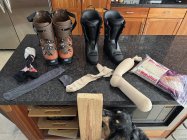
first grab your supply’s. Boots, liners, ski socks, extra tube socks for the rice, ideally another set you can cut the toes off to make toe caps with, rice and a 2x4 or similar you can lean on to create some pressure while molding is the minimum you’re going to need.
dog is optional
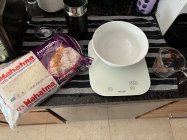
I also used a scale for weighing the rice, a bowl to hold the rice while weighing and a measuring cup to pour the rice into the socks. I used in total 3lbs of rice. Your weight can vary depending on your boot size. I’m a 26.5.
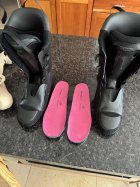
Remove your liners from your boots and remove any inserts you may have in the liners as well as any laces. You’ll want to do one liner at a time. Take your time as you can always heat mold again if you don’t feel you did it right the first time.
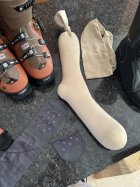
Go ahead and measure out about 3lbs of rice and start filling the sock. You want it fairly full where is takes shape but not so full that you cannot manipulate the shape of the sock and rice. You want to be able to fit this all inside your liner. Once you have the rice in the sock tie off the end. It should look like a really shitty foot and ankle.
microwave the sock. Depending on your wattage you’ll need 4-7 mins. I have a 1200w microwave and I did 6 mins. Brings the rice plenty hot enough to soften the liner but not hot enough to melt the sock or cause damage to the liner.

once the sock is done in the microwave go ahead and grab it by the knotted end. Be cautious as the rice will be fairly hot. Drop the sock toe end first into your liner with the footbed removed. Do your best to tap the toes and heel to get the rice to settle down into the liners toe and heel area. Do your best to fill the whole liner. It should be fairly easy to feel where the rice and sock are. Once you have it as full as possible go ahead and let the liner sit for 12 mins. I use some ski straps to lightly pull the tongue into the boot to get more heat into the calf area and tongue itself.
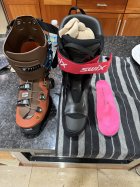
While you’re waiting go ahead and take your spare set of socks and chop to the toe off to make a toe cap. This will give you a tad more room and comfort in the long run. Slip it over your toes. You’ll also want to go ahead and put on the boot of the foot you’re not heat molding now, it will make everything more comfortable and better aligned when it’s time to stand for the molding
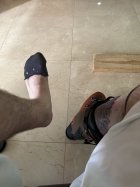
then go ahead and put on your favorite ski socks. Ideally thin ones. Make sure there are no folds or creases and that everything is super smooth. Any ridges or bumps may imprint on your liner.
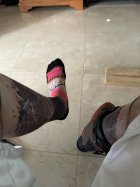
Once your timer for the liner is up go ahead and remove the sock with the rice and ski strap if you used one. Install your insert or footbed and put the liner back into the boot. Put your foot into your liner and boot and go ahead and secure the buckles. For your first time just lightly secure your buckles, a little tighter than what you would ski is fine just keep in mind the tighter you make the buckles the more you’ll heat pack the liners out. So if your liner fits fairly nice out of the box and you over tighten the buckles you may find you over packed your liners right away. It’s easier to do it lightly the first time and if needed do it again tighter with a second round of heat molding. Or just let the liners pack out when you ski.
you’ll want to place the 2x4 or whatever item you’re going to use for leverage on the floor. Step onto the 2x4 with just your toes and apply forward pressure by getting into a slightly knees bent skiing position. Set your timer for 15 mins and hang out. Try to move as little as possibly ideally. You can wiggle your toes a bit to create a little extra room.
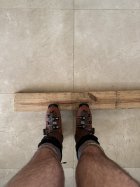
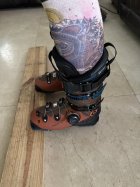
Once your 15 mins are up go ahead and remove the boot that has NOT been heat molded yet and follow the process all over again. I personally left on the boot that was already molded while I prepped the second boot and liner. Once you’ve done both boots go ahead and sit back and enjoy a libation and your handy work.

Overall it’s a pretty easy job and can get you headed in a decent direction comfort wise. If you feel you want more. Do it again you can always heat mold it more. You just can’t really go reverse once you’ve really packed out a liner. So less is more to begin with.
hope this helps a few peeps. Feel free to add anything if you’ve done this before and have extra tips.
first grab your supply’s. Boots, liners, ski socks, extra tube socks for the rice, ideally another set you can cut the toes off to make toe caps with, rice and a 2x4 or similar you can lean on to create some pressure while molding is the minimum you’re going to need.
dog is optional

I also used a scale for weighing the rice, a bowl to hold the rice while weighing and a measuring cup to pour the rice into the socks. I used in total 3lbs of rice. Your weight can vary depending on your boot size. I’m a 26.5.

Remove your liners from your boots and remove any inserts you may have in the liners as well as any laces. You’ll want to do one liner at a time. Take your time as you can always heat mold again if you don’t feel you did it right the first time.

Go ahead and measure out about 3lbs of rice and start filling the sock. You want it fairly full where is takes shape but not so full that you cannot manipulate the shape of the sock and rice. You want to be able to fit this all inside your liner. Once you have the rice in the sock tie off the end. It should look like a really shitty foot and ankle.

microwave the sock. Depending on your wattage you’ll need 4-7 mins. I have a 1200w microwave and I did 6 mins. Brings the rice plenty hot enough to soften the liner but not hot enough to melt the sock or cause damage to the liner.

once the sock is done in the microwave go ahead and grab it by the knotted end. Be cautious as the rice will be fairly hot. Drop the sock toe end first into your liner with the footbed removed. Do your best to tap the toes and heel to get the rice to settle down into the liners toe and heel area. Do your best to fill the whole liner. It should be fairly easy to feel where the rice and sock are. Once you have it as full as possible go ahead and let the liner sit for 12 mins. I use some ski straps to lightly pull the tongue into the boot to get more heat into the calf area and tongue itself.

While you’re waiting go ahead and take your spare set of socks and chop to the toe off to make a toe cap. This will give you a tad more room and comfort in the long run. Slip it over your toes. You’ll also want to go ahead and put on the boot of the foot you’re not heat molding now, it will make everything more comfortable and better aligned when it’s time to stand for the molding

then go ahead and put on your favorite ski socks. Ideally thin ones. Make sure there are no folds or creases and that everything is super smooth. Any ridges or bumps may imprint on your liner.

Once your timer for the liner is up go ahead and remove the sock with the rice and ski strap if you used one. Install your insert or footbed and put the liner back into the boot. Put your foot into your liner and boot and go ahead and secure the buckles. For your first time just lightly secure your buckles, a little tighter than what you would ski is fine just keep in mind the tighter you make the buckles the more you’ll heat pack the liners out. So if your liner fits fairly nice out of the box and you over tighten the buckles you may find you over packed your liners right away. It’s easier to do it lightly the first time and if needed do it again tighter with a second round of heat molding. Or just let the liners pack out when you ski.
you’ll want to place the 2x4 or whatever item you’re going to use for leverage on the floor. Step onto the 2x4 with just your toes and apply forward pressure by getting into a slightly knees bent skiing position. Set your timer for 15 mins and hang out. Try to move as little as possibly ideally. You can wiggle your toes a bit to create a little extra room.


Once your 15 mins are up go ahead and remove the boot that has NOT been heat molded yet and follow the process all over again. I personally left on the boot that was already molded while I prepped the second boot and liner. Once you’ve done both boots go ahead and sit back and enjoy a libation and your handy work.

Overall it’s a pretty easy job and can get you headed in a decent direction comfort wise. If you feel you want more. Do it again you can always heat mold it more. You just can’t really go reverse once you’ve really packed out a liner. So less is more to begin with.
hope this helps a few peeps. Feel free to add anything if you’ve done this before and have extra tips.