elm.
Active member
Last year I got more into skiing than any other year snowboarding (converted). After the season ended, I was thirsty for more skiing, but living in Seattle, WA, there was no where I could ski besides Timberline and Whistler which was out of the question. I knew about dry slopes before and did some research online. I found that there was no real good guide to build a dry slope. I ended up building a great dry slope after several failures.
I'm hoping that my advice, and pictures will help anyone building a dry slope.
Total cost = around $70
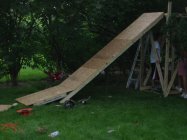
1st failure - I was extremely impatient and my design shows it. It was my dad's idea to use a table with two legs folded down. I gave it extra support underneath, and built a jump at the end. The main problem was not enough speed and that the jump was not above the ground. I was happy in the end with this failure, though. It costed me almost nothing and I had a rail finished, and astroturf to work with on my second attempt. I learned a lot from this failure.
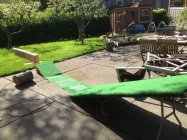
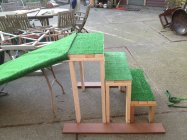
2nd attempt - success (after one month of building, tweaking, and modifying). Unfortunately I don't have the early pictures of building this dry slope. My plan was to use this as a model, but put it much higher off the ground (lowest part of dry slope is 1 1/2 feet off the ground).
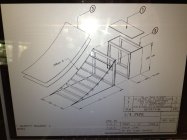
I liked the idea of a large, comfortable platform to stand on at the top, and a wide area to ski down with a gradual curved transition as the lip.
This is a picture when I am about halfway finished

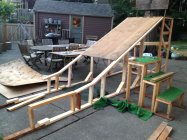
I bought most of my wood from Home Depot and Dunn Lumber, and the wood scrapyard. I got the cheapest 2X4's I could buy (about $2.50 for an 8 footer) I met a very helpful friend at Dunn Lumber. He is a college student at Whitman college who had built a dry slope of his own in his yard and a fellow NS'er. I was fortunate enough to inherit some of his scraps including lattice fencing and thick astroturf. This cut my costs down by about $30.
Through this project I learned some essential woodworking skills including toenailing, how to use a power saw, measuring, and leveling.
Even at the end, the dry slope was still too slow. Luckily this was easy to fix with more lattice fencing and soap.
The final Product

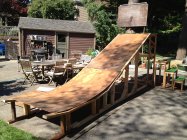
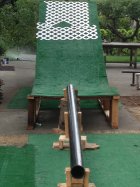
I also ended up building 4 different rails, with the black tube the smoothest and most successful.
Here's my edit. I learned many other tricks not shown in the video. More than 10 of my friends skied it over the summer and improved their rail skills.
/images/flash_video_placeholder.png
In the end I learned a great deal. I will use these new carpentry skills again hopefully to build more jibs and jumps and other things. My rail game has improved a lot. The best part was building it and having a great time skiing with my friends over the summer. Hopefully posting this project will help anyone else in the future building a dry slope.
I'm hoping that my advice, and pictures will help anyone building a dry slope.
Total cost = around $70
1st failure - I was extremely impatient and my design shows it. It was my dad's idea to use a table with two legs folded down. I gave it extra support underneath, and built a jump at the end. The main problem was not enough speed and that the jump was not above the ground. I was happy in the end with this failure, though. It costed me almost nothing and I had a rail finished, and astroturf to work with on my second attempt. I learned a lot from this failure.


2nd attempt - success (after one month of building, tweaking, and modifying). Unfortunately I don't have the early pictures of building this dry slope. My plan was to use this as a model, but put it much higher off the ground (lowest part of dry slope is 1 1/2 feet off the ground).

I liked the idea of a large, comfortable platform to stand on at the top, and a wide area to ski down with a gradual curved transition as the lip.
This is a picture when I am about halfway finished


I bought most of my wood from Home Depot and Dunn Lumber, and the wood scrapyard. I got the cheapest 2X4's I could buy (about $2.50 for an 8 footer) I met a very helpful friend at Dunn Lumber. He is a college student at Whitman college who had built a dry slope of his own in his yard and a fellow NS'er. I was fortunate enough to inherit some of his scraps including lattice fencing and thick astroturf. This cut my costs down by about $30.
Through this project I learned some essential woodworking skills including toenailing, how to use a power saw, measuring, and leveling.
Even at the end, the dry slope was still too slow. Luckily this was easy to fix with more lattice fencing and soap.
The final Product


I also ended up building 4 different rails, with the black tube the smoothest and most successful.
Here's my edit. I learned many other tricks not shown in the video. More than 10 of my friends skied it over the summer and improved their rail skills.
/images/flash_video_placeholder.png
In the end I learned a great deal. I will use these new carpentry skills again hopefully to build more jibs and jumps and other things. My rail game has improved a lot. The best part was building it and having a great time skiing with my friends over the summer. Hopefully posting this project will help anyone else in the future building a dry slope.
